We use cookies to make your experience better. To comply with the new e-Privacy directive, we need to ask for your consent to set the cookies. Learn more.
Print File Technical Specifications - digital printing
File format
PDF (You can also use other file formats if needed.)
Measurements
1:1 size (mm/cm) relative to the size of the product/print
Resolution
Business cards - A6 | 600dpi
A6-A0 | 300dpi
A0+ | 200dpi
Bleeds
min. 2mm / recommended 3mm (trim marks not mandatory)
Fonts
Convert fonts to outlines/paths/vectors to prevent them from changing during printing due to potential compatibility issues.
Details
Lines min. 0,25pt thick
Font size min. 3pt, recommended 7pt (font-specific differences)
Colour space
CMYK. RGB is recommended only with decorative posters.
Colour profile
PSO Coated v3 (FOGRA 51)
Alignment
One product per page centered. We handle sheet layouts ourselves.
Die-cutting and spot effects
In special cuts, cutting line marked on a separate layer or page in the correct position (thin magenta line OK). Foiling and spot UV on their own page.
Additional technical details below on the page.
Program-specific instructions
Canva is a popular free web-based design tool. In Canva, you can find free design templates for various products and purposes. You can download the print file to your device and then upload it to your MEB order.
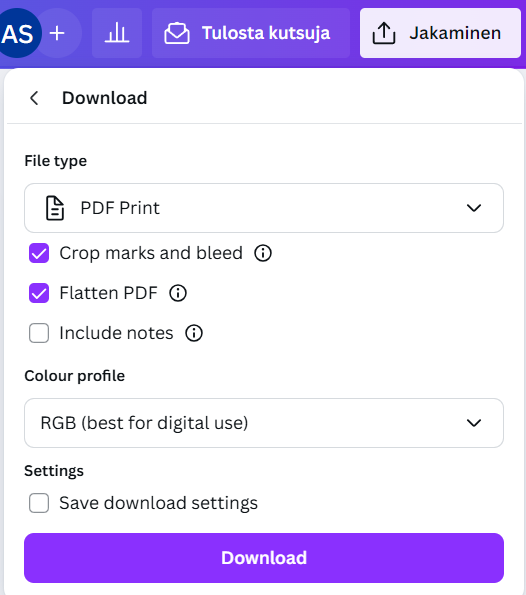
Download the file by clicking on the top menu Sharing or File, then Download, and make these selections before downloading:
- File type: PDF - Print
- Crop marks / bleed
- Flatten PDF (optional, but reduces the risk of print not matching the file)
- Color profile preferably CMYK (paid feature). Printers use CMYK colors, so RGB color profile files may not reproduce shades as accurately in print.
You can create appropriately sized files on Canva. Check the dimensions of the print product on our product page.
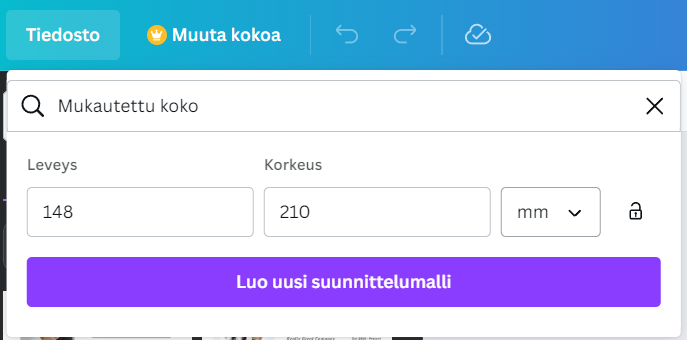
Click on the top menu File > Create a new design > Custom size
Choose millimeters as the unit of measurement and enter the product dimensions without bleed, for example, for designing an A5 size (148x210mm) product, enter dimensions as 148x210mm.
Take bleed areas into account when designing to ensure there is enough bleed for clean cutting.
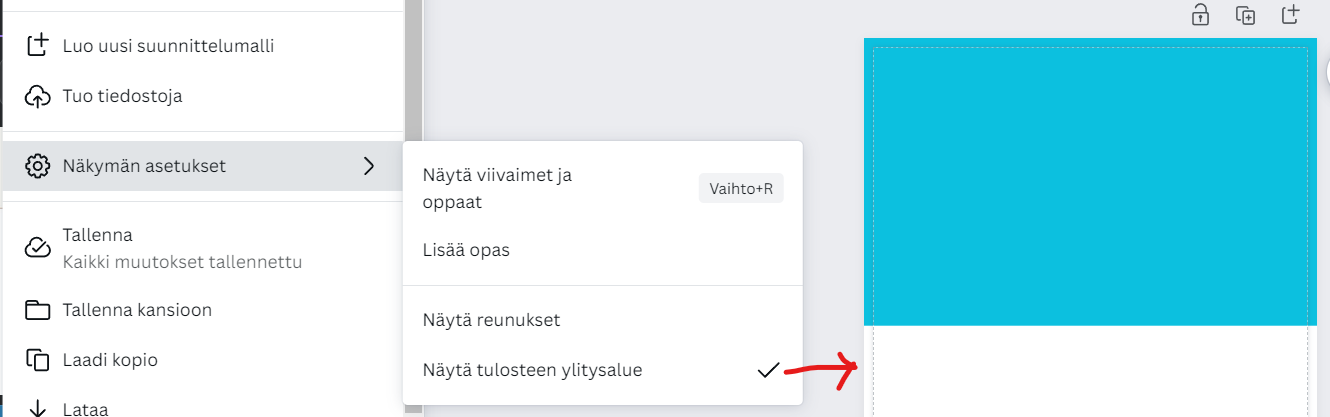
Click on the top menu File > View > Show print bleed
The area outside the dashed line that appears is the bleed area. All elements that extend to the edge (background colors, background images, graphic elements) should extend beyond the dashed line to the outer edge of the document. Remember to leave sufficient distance inward from the dashed line for text and other elements that need to be kept a safe distance from the edges.
Adobe Photoshop is a professional image editing program. You can also position text and create striking layouts for print. GIMP is a similar free program that follows similar guidelines.
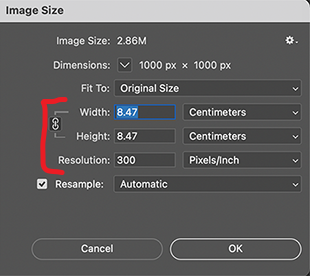
It's important to note that by default, materials produced in Photoshop are pixel-based. For instance, text, shapes, and vector graphics convert to pixels when saved, so it's crucial to set the image resolution high enough, preferably at 300dpi.
Use the actual physical dimensions of the product as the image dimensions (mm or cm). With sufficient resolution and accurate dimensions, there will be enough pixels to prevent the file from becoming blurry when saved.
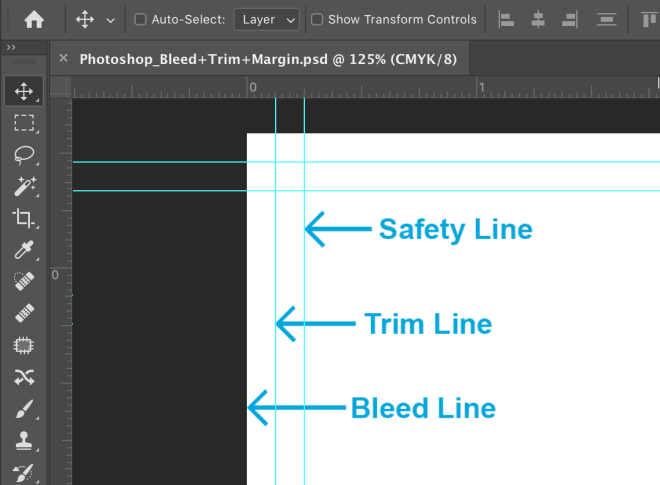
In Photoshop, include bleed areas in the document dimensions. For example, for an A5 size product (148x210mm), the file size should be 152x214mm including 2mm bleed (to every side). Photoshop does not show bleed guides automatically, so you can use rulers to help visualize where the cut will be.
When preparing print materials, we strongly recommend using the CMYK color space. Photoshop is typically used for editing photos, which are originally in RGB colors. Therefore, Photoshop's default 'Color Mode' is RGB, but we recommend changing it to CMYK by clicking on Image > Mode > CMYK Color in the top menu.
When saving a PDF file from Photoshop, you can choose a preset. We recommend using the "PDF/X‑4" or "Press Quality" presets. It's important to maintain quality during the saving process, so make sure that on the Compression tab, no settings are enabled that degrade quality (such as Downsampling and Compression Image Quality).
Adobe Illustrator and CorelDRAW are vector graphics programs used by professionals to create logos and print materials. Vector graphics are suitable for all printing techniques and products, which is why CorelDRAW is the most used program at MEB. Vector graphics consist of lines and shapes, allowing them to be scaled up without loss of quality, unlike raster graphics.
When creating a new document, remember to include necessary bleed areas and set the color mode to CMYK.
When saving the final PDF file, ensure that bleed areas are included in the saved file. Also, check that fonts are converted to outlines and that image quality does not degrade during saving. Make sure that any linked images are embedded in the PDF file so they open correctly as separate files on our machines as well.
Both programs offer presets for PDF saving, and the recommended one is the PDF/X-4 standard.
Adobe InDesign is particularly popular for multi-page publications. Its strengths shine when laying out brochures and books, but it's also excellent for creating neat business cards and advertisements.
We prefer receiving materials designed in InDesign in PDF format, and the same guidelines apply as for Illustrator (see the other tab).
If you send us InDesign files for editing, please include the entire 'package' with fonts and linked images, including an IDML file that ensures compatibility on our end.
Microsoft Word is a popular word processing program that can also be used to create print materials. Microsoft PowerPoint is also a familiar program for designing layouts. Remember these points when using either program:
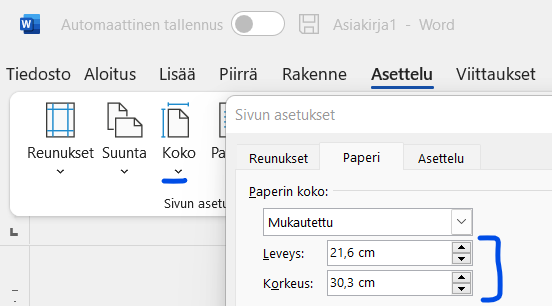
Use the correct page size.
Word: From the top menu Layout > Size > More Paper Sizes.
PowerPoint: From the top menu Design > Slide Size > Custom Slide Size.
You'll find common default paper sizes listed, but they do not include bleed for printing. So, if you're designing an A4-size (210x297mm) flyer that requires full bleed (color/background goes to the edges), choose a paper size with 3mm bleed, making it 216x303mm.
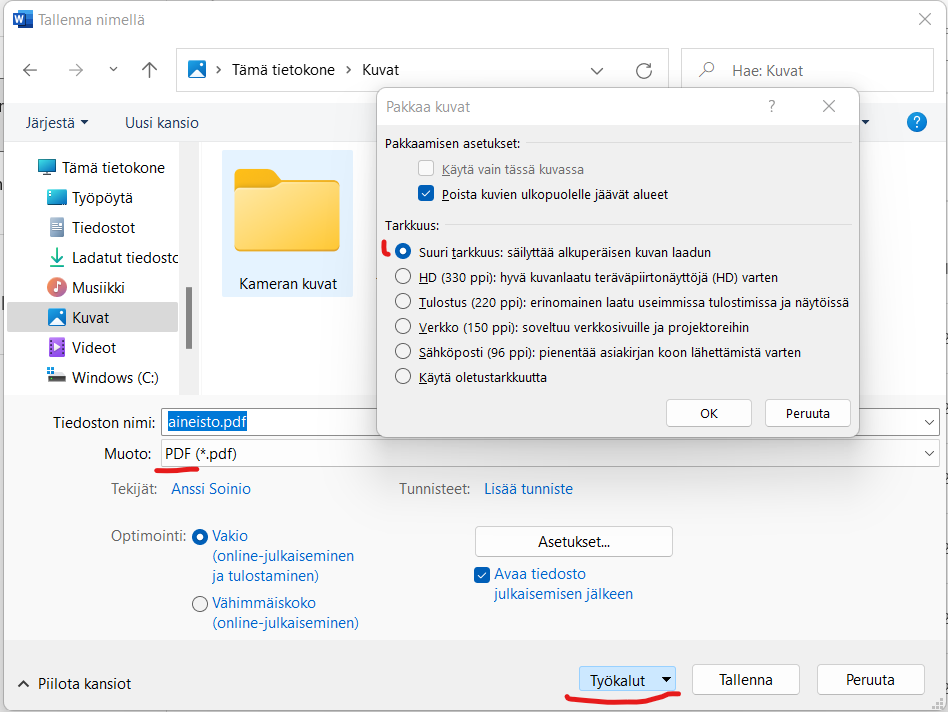
Save the material in PDF format. Go to File > Save As and select 'More options...' below the file name and format fields. In the window that opens, you can choose the name and format as PDF.
If your material contains images, make sure their quality does not degrade when saving. Click on Tools at the bottom > Compress Pictures... and select 'High fidelity' for resolution.
Google Docs and Slides are popular Google’s alternatives to Microsoft’s Word and PowerPoint. They are cloud based and come free with your Google account.
At the moment, Docs does not support natively custom paper sizes but they do have the most common ones. A popular fix is to install an add-on from the Extensions menu on the top. Slides on the other hand does support custom sizes.
Docs: File > Page setup > Paper size
Slides: File > Page setup > Page Size > Custom
Save the material in PDF format. There is a problem with this, though. Similar to the Page size problem in Docs, both software can only do simple PDF downloads without the ability to customize export settings. Once again, a popular fix is to install an add-on from the Extensions menu.
File > Download > PDF Document
File quality
Is my file quality sufficient, and what should its resolution be? A good way to check quality is to zoom in on the file on your screen. If it looks good when enlarged, it will likely print well at a smaller size—and vice versa. If the quality looks poor on the screen, the print will also be poor.
For print materials viewed up close (e.g., business cards or brochures), a good image resolution is 300-600 dpi. Lower resolutions can be used for large format prints that will be viewed from a distance. For web images, it is ideal if the image size is over 1000x1000 pixels to print reasonably sharp even at postcard size (A6). High resolution is especially important for photographs.
If you don't have image editing software, an easy way to check file resolution is to zoom in to 300-400% on your screen. If the file looks good and isn't blurry or pixelated, the quality is good — depending, of course, on the size of the print.
If you are unsure about your file quality, ask us for a professional opinion. We always notify customers if we suspect the file is of insufficient quality for printing.
Bleed and Margins
When printing a large stack of pages, the print alignment never hits exactly the same spot on every page. Therefore, it helps to add bleed areas for clean trimming. If you know your product will be trimmed to remove white edges that appear during printing, add at least 2mm of extra background/image to the edges of your file. However, do not stretch images or other content too close to the file edges, as they might get cut off.
For example, when ordering business cards, the final trimmed size is 90x50mm. With 2mm bleeds, the file size should be 94x54mm. There is no need to add crop marks or any other extra elements to the files.
Texts and other important content should be kept as far from the edges as possible. Due to the variability in print and trim alignment, content close to the edges is at risk of being cut off. Therefore, it is recommended to keep important content at least 5mm from the edges (after trimming). So, if your file has 2mm bleeds, important content should be 7mm from the file edges. You can design elements to go right to the edge, but keep in mind that the print/trim might not hit the exact spot you planned. The margin of error is approximately ±1mm.
Colour Spaces
In digital printing, CMYK (Cyan, Magenta, Yellow, Black) colours are almost exclusively used. Ensure your file is in CMYK colours. If your file is in RGB (Red, Green, Blue), the shades are likely to change (usually becoming darker) when printed. You can change the colour profile in programs like Adobe Photoshop. Computer screens display everything in RGB, so the image on the screen will usually print in slightly different shades due to the screen's lighting/brightness.
-
 MEB Services
-
 Business Cards Fast
-
 Flyers & Brochures
-
 Cards & Envelopes
-
 Posters & Artwork
-
 Clothes & Textiles
-
 Stickers & Labels
-
 Stamps
-
 Banners & Stands
-
 Trophies & Awards
-
 Signs & Badges
-
 Walls & Beach Flags
-
 Gifts
Gifts
-
 Promotional Products
-
 Packaging
-
 Weddings
-
 Events
-
 Trade show
-
 Restaurants
-
 Offices
- Business Products
- Customer products